ISS domain redirect from old domain to new with subdomain

Default web.config file

<configuration>
<system.webServer>
<rewrite>
<rules>

</rules>
</rewrite>
</system.webServer>
</configuration>


Add this between <rules> and</rules>

<rule name=”domain_redirect” stopProcessing=”true”>
<match url=”(.*)” />
<conditions>
<add input=”{HTTP_HOST}” pattern=”^www\.olddomain\.de$” />
</conditions>
<action type=”Redirect” url=”https://www.newdomain.de/{R:1}” redirectType=”Permanent” />
</rule>


Replace olddomain and newdomain with your value and maybe change the www value to your subdomain.

Maintenance Website with Microsoft Azure Traffic Manager profiles

 
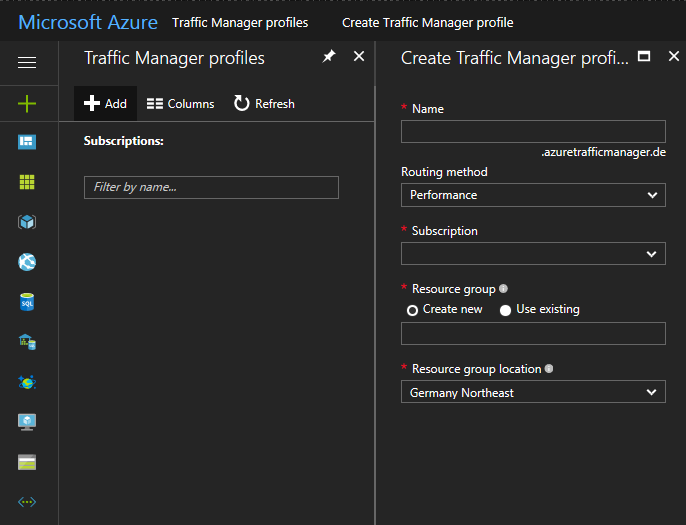
1. Create traffic manager profile


2. Add endpoints It is important that you add only web services from different locations!!!


3. Add the CNAME record on your DNS
 
portal.domain.de CNAME yourazuretrafficmanager.azuretrafficmanager.de.
 
 
4. If you need SSL/HTTPS you must configure all web services with the same domain and SSL certificate


RackTables on Ubuntu 16.04


Step 1:

sudo -s

Step 2:

apt-get install mysql-server

Step 3:

printf “[mysqld]\ncharacter-set-server=utf8\n” > /etc/mysql/conf.d/charset.cnf; service mysql restart

Step 4:

apt-get install apache2-bin libapache2-mod-php7.0 php7.0-gd php7.0-mysql php7.0-mbstring php7.0-bcmath php7.0-json php7.0-snmp

Step 5:

cd /home/….

Step 6:

wget https://downloads.sourceforge.net/project/racktables/RackTables-0.20.13.tar.gz

Step 7:

tar -xf RackTables-0.20.13.tar.gz

Step 8:

mv ./RackTables-0.20.13 /var/www/html

Step 9:

cd /var/www/html

ln -s RackTables-0.20.13 racktables

Step 10:

nano /etc/apache2/sites-available/000-default.conf

Step 11:

DocumentRoot /var/www/html/racktables/wwwroot

Step 12:

/etc/init.d/apache2 restart

Step 13:

touch ‘/var/www/html/RackTables-0.20.13/wwwroot/inc/secret.php’; chmod a=rw ‘/var/www/html/RackTables-0.20.13/wwwroot/inc/secret.php’

Step 14:

mysql -u root -p

Step 15:

CREATE DATABASE racktables_db CHARACTER SET utf8 COLLATE utf8_general_ci;
GRANT ALL PRIVILEGES ON racktables_db.* TO racktables_user@localhost IDENTIFIED BY ‘MY_SECRET_PASSWORD’;

Step 16:

Start the Installation goto http://yourRackTablesServer

Step 17:

/var/www/html/racktables/wwwroot/inc# chown www-data:nogroup secret.php; chmod 440 secret.php


That´s IT


SQL Verbindungen und aktive Logins

— SQL Verbindungen nach Anzahl


SELECT @@ServerName AS server
,NAME AS dbname
,COUNT(STATUS) AS number_of_connections
,GETDATE() AS timestamp
FROM sys.databases sd
LEFT JOIN sysprocesses sp ON sd.database_id = sp.dbid
WHERE database_id NOT BETWEEN 1 AND 4
GROUP BY NAME


— SQL Verbindungen nach Logins


SELECT @@ServerName AS SERVER
,NAME
,login_time
,last_batch
,getdate() AS DATE
,STATUS
,hostname
,program_name
,nt_username
,loginame
FROM sys.databases d
LEFT JOIN sysprocesses sp ON d.database_id = sp.dbid
WHERE database_id NOT BETWEEN 0
AND 4
AND loginame IS NOT NULL

SFTP Zugang mit openssh ohne Shell Zugriff

Um eine SFTP Verbindung möglich zu machen ohne direkten Shell zugriff muss die Konfiguration von sshd geändert werden.


Step 1: Gruppe definieren welche von ssshd anders behandelt wird

sudo nano /etc/ssh/sshd_config


  #Subsystem sftp /usr/lib/openssh/sftp-server
  Subsystem sftp internal-sftp
 
  Match Group sftp
  ChrootDirectory %h
  ForceCommand internal-sftp
  AllowTcpForwarding no


Step 2: User anlegen für die Gruppe

sudo addgroup sftp

sudo useradd -m -s /bin/false -G sftp sftptest

sudo passwd sftptest


Step 3: Home Verzeichnis für User anlegen und Berechtigungen vergeben

sudo chown root:root /home/sftptest/

sudo chmod 0755 /home/sftptest/


sudo mkdir /home/sftptest/upload

sudo chown sftptest:sftptest /home/sftptest/upload


Step 4: Testen

Nun kann das ganze per SFTP getestet werden und ich würde an eurer Stelle schauen ob die SSH Verbindung funktioniert oder nicht.


That´s IT


NFS Mount Windows

Um NFS Volumes in Windows zu mounten muss die NFS Komponente unter Turn Windows features on or off installiert werden. Danach kann das Volume per Kommandozeile gemounted werden.

mount -o mtype=hard \\IP-Adresse\mount_Pfad <Laufwerksbuchstabe (Z:)>


That´s IT